
My longtime baking partner, Suzi, and I catered a bridal shower in mid-May for an older bride. We decided to base our theme loosely on pastel shades of green, yellow, and lavender. The shower was for about 30 ladies, hosted by three coworkers. The party was set at teatime, with a menu of tea foods, but with champagne punch instead of tea. There were other menu parameters as well: the shower hostesses requested non-drippy finger foods, no forks, nothing served hot, and no large cake. One of the hostesses was in charge of the punch.
Our job was to deliver garnished platters, ready to serve. We also had a limited budget, as we were doing this catering gig as a kind of showcase for our catering business. One of the hostesses also reminded us that the guest list included some not very adventurous eaters. Suzi also had to work the day before the event. The success of this job, as with most catering jobs, was in the planning, specifically, structuring the menu to conform to the parameters while presenting a visually delightful and delicious menu. I love this kind of puzzle! And as luck would have it, Aunt Rose was visiting on the mainland and we got to spend happy hours discussing each item on the menu and testing a few recipes together: heaven!
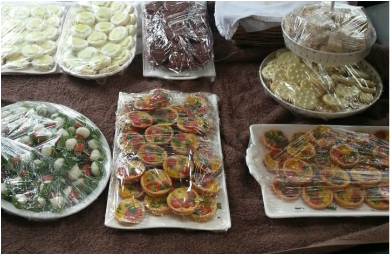


Desserts: the fun part! The hostesses had requested more savories than sweets, but we counted three types of cookies as one cookie tray. (Baker’s own brand of math.) With cookies, Suzi, Rose, and I all tend to start with the tea classics. The three cookie recipes we chose are all from our website, www.myteaplanner.com. Scottish shortbread is always on our menu. I chose the Lavender Shortbread recipe from The Honey Bee Tea in the Garden menu. Since we were showing off a little bit, I glazed the shortbread fingers with a lemon-based icing and sprinkled a tiny mound of powdered culinary lavender mixed with lavender-hued sparkling sugar. (It’s very easy to go overboard with dried lavender, making cookies taste like soap. Do try to avoid that peril.)
Where we diverge is chocolate. When I summarized my potential dessert menu to Rose, she looked horrified and said, “Where’s the chocolate? Ladies will not be happy without chocolate.†She had a valid point and Suzi agreed. My hesitation in putting chocolate on a springtime tea menu is twofold: 1. It’s unkind to white linen napkins, 2. Being brown, it’s not very spring-like. A dilemma. To minimize the messy factor, I decided one of our three cookies could be chocolate. We settled on small chocolate heart cookies, sandwiched with a sour cherry filling, from our February Valentine’s Day Tea menu. Our third cookie utilized Suzi’s decorated cookie background. We used her Vanilla Bean Sugar Cookie dough from our JulyPicnic Tea to make small sugar cookie circles, flooded with buttery yellow royal icing, trimmed with white dots. These little cookies are charming and easily made ahead due to the keeping properties of royal icing which acts as a sealant to the cookies.
​
​

I began looking for a good recipe. I started with a mousse that was gelatin based, as I love combining whipped cream with gelatin and fruit to make something ethereal. Let’s say that this recipe was not that. More like sticky marshmallow melted with toothpaste: ugh. More mousse research revealed that those creations in the 1970’s and 1980’s were made light with both whipped cream and whipped raw egg white. I have no problem with eating raw eggs, but current food safely standards forbid such things. Attempt number two relied on white chocolate for structure. It had a nice texture but the inexpensive white chocolate flavor fought with the mint flavor. Attempt number three used a little cream cheese to bolster the texture. Unfortunately, the slightly sour taste of the cream cheese didn’t work with the mint and the texture was gummy. At this point, I wondered if I should abandon the whole minty problem. Suzi recommended trying recipe #2 again with Guittard Choc-Au-Lait chips, which had always worked beautifully for her. I also added a little more of both liqueurs. Perfect texture, great taste.
On to the garnish. As I had been obsessing about this tiny mousse for several days now, I’d come up with three different garnishes: chocolate cookie crumbs, a variety of fresh mint called “chocolate†mint, featuring green leaves with reddish-brown veins, and Andes mint squares. I was concerned the cookie crumbs would become soggy so I ruled them out. I had an inspiration to shave the side of the Andes mint square with a vegetable peeler, making the tiniest chocolate brown and green striped curls. I showed the curls to Suzi. She loved them and they became our chosen garnish.
Now that the menu was complete, I reviewed for any omissions. There was no fruit—unthinkable. But we didn’t want anything too fussy, and no forks were allowed. The first spring fruit is generally strawberries but the ones I had seen in the market had looked a little tired, green crowns kind of wilted. I asked around at our local markets and found I could order the large-sized, long-stemmed berries usually reserved for dipping. The best of these beautiful, elite strawberries come from Driscoll. They would make a stunning focal point for the buffet table in a clear glass, footed trifle bowl. The menu was now officially complete, with Rose, Suzi, and I all in agreement that this was the spring menu that best fit the occasion.
Grasshopper Mousse #2 with Chocolate Pudding Base
In the end, I decided to go along with Rose and Suzi’s dictum: more chocolate. I first poured a layer about an inch deep of warm chocolate pudding into each serving cup then chilled the cups on a tray, covered with plastic wrap. The next day, I topped the pudding with mousse, garnishing with Andes mint curls. Begin this recipe several hours or up to 4 days before serving.
Pudding base: I box (3.4 ounces) dark chocolate cook and serve pudding mix, not instant
2 cups whole milk or half and half
3 ounces good quality dark chocolate, chopped
Mousse: 6 ounces (half a bag) good-quality white chocolate chips, we recommend Guittard Choc-Au-Lait vanilla milk chips
3 tablespoons crème de cocoa
3 tablespoons crème de menthe
1 cup whipping cream, chilled
15 to 18 drops liquid green food color or small dab of gel color
Optional garnish(es): shaved Andes mint squares, chocolate cookies or cookie crumbs, mint leaves, whipped cream, chocolate sauce
Special equipment: tray large enough to hold individual serving glasses, glass or plastic serving glasses, heavy-bottom saucepan, silicone scraper, plastic wrap, heat-proof medium bowl or 4 cup Pyrex measuring cup, whisk, hand or stand mixer with mixer bowl and beaters, chilled, tablespoon or piping bag and large star tip
Makes about 5 1/2 cups
- Pudding base: arrange pretty glass or plastic serving glasses on a tray. (Depending on the size chosen, the recipe will make anywhere from 6 large to 18 very small servings.)
- In a heavy-bottom saucepan, stir together pudding mix and milk. Cook and stir over medium heat until mixture comes to a full boil.
- Remove from heat and stir in chopped chocolate until chocolate is melted and mixture is smooth.
- Divide among serving glasses. Cover tray with plastic wrap and chill until cold, two hours or up to four days.
- Mousse: place white chocolate chips and liqueurs in heatproof bowl. Microwave at 50% power at 30 second intervals, until chips are almost melted, between 1 and 2 minutes total. Whisk until completely melted and mixture is smooth. Set aside for 5 to 10 minutes until slightly cooled.
- In chilled mixer bowl, whip chilled cream until stiff peaks form, scraping bowl as needed.
- Fold chocolate mixture into whipped cream. Add food color until pale green color is achieved. Cover and chill at lease 3 hours or up to four days.
- Assembly: remove tray of pudding bases from fridge. Remove plastic wrap. Divide mousse equally by large spoonfuls or pipe from piping bag fitted with large star tip. Garnish just before serving. Chill leftovers promptly.